Friday, 28 June 2013

D-Link Gaming Router pre-orders now available

When it comes to networking devices, many of us would definitely have heard of the name “D-Link” before, as this particular company is no stranger at all after being in the market for so many years. They have had their fair share of hits in the past.


But if you were to have a parallel in contemporary terms, D-Link’s brand is somewhat like Toyota or Honda – delivering a functional and reliable device, and yet they are not really all that eye-catching in the first place, and neither does it make the heart race when one sets their eyes on it. Having said that, D-Link has just made available the pre-order of their most advanced Gaming Router ever, the D-Link Gaming Router with Qualcomm StreamBoost technology, or the DGL-5500 if model numbers are your cup of tea.


The D-Link Gaming Router would come with AC1300 wireless speeds that are unique to traffic shaping and bandwidth management, and it will also work in tandem with a quartet of gigabit Ethernet ports so that it can deliver the ultimate in gaming performance, media streaming and network control. Of course, placing a pre-order would still mean that a little bit of waiting is in order, and those who are interested in picking up the D-Link Gaming Router at $199.99 a pop via newegg.com would have to wait until August 1st for shipping to commence.
Listen to what Daniel Kelley, vice president of marketing, D-Link Systems, Inc., had to say about the Gaming Router, “The Gaming Router represents the ultimate in high-performance connectivity to give power users the ability and control they need to do what they love online without the concern or interruption of buffering and lag. Today’s action role-playing games and MMOs are more competitive than ever and with limited bandwidth coming into the home, gamers need to ensure they’re making the most of their connectivity to maintain an advantage. With Qualcomm StreamBoost technology, the new Gaming Router is designed to do just that – shape the network traffic to help gamers do more and lag less.”
I admit, this is the first time that I have heard about the Qualcomm StreamBoost technology, but apparently it has been designed to deliver a robust connected experience to users regardless of the device that they use over the home network, and this is achieved by intelligently managing and shaping traffic, while providing individual devices and applications the priority and bandwidth required in order to enjoy optimal performance.

Thursday, 27 June 2013

PortaPow USB Power Monitor lets you know how much power your gadgets use

With the economy the way it has been, it’s important to cut costs wherever you can. Everyone has a different approach to this, whether it’s taking a bike to work, instead of a car, or trying to eat out less. However, there are some people who really want to save every cent, and for those people, the best place to look is at your electronic devices.


Each and every one of these needs power to run, and electricity isn’t free (unless you’re using some sort of alternative energy, like solar power, but that’s a different conversation). So how to you keep track of how much juice each of your gadgets needs?

I’ve seen plenty of devices that you can use with most two or three-prong power cords, to see just how much electricity is flowing to the gadget. While these are great, they don’t cover everything. What about your USB devices? How much electricity are they sucking up, when they are in use? Well, this PortaPow USB Power Monitor can tell you that, and more.
By plugging this gadget in between your computer, and whatever device you have plugged in, you can see how much power is being drawn. You can also use it in conjunction with a solar panel, to see how much electricity is being generated. This will allow you to reposition the panel to ensure that you’re getting the most out of the light. This nifty little device might not be a life-changing purchase, but the $19 price won’t break the bank.

Tuesday, 25 June 2013

Transcend-USB-3.0-Expresscard-Adapter


For laptop users desiring to join the USB 3.0 revolution without replacing their existing computer, Transcend’s USB 3.0 ExpressCard Adapter is a highly cost-effective solution for connecting to and taking advantage of USB 3.0-compatible peripherals. The card’s ExpressCard/34 interface is compatible with virtually all current notebook computers, and offers unrestricted two-way communication between notebook PCs and the latest generation of USB devices.

The new USB 3.0 ExpressCard Adapter comes with two high-speed USB ports that fully support SuperSpeed USB 3.0 standard with connection bandwidth of up to 5Gb/s. Besides its quick and easy installation, the card enables speed enthusiasts to experience data transfer rates up to ten times faster than USB 2.0 with optimized power efficiency. Thanks to its backwards compatibility with USB 2.0 and USB 1.1, users can be assured that their older devices will still work with the new interface.

Transcend’s PNU3 USB 3.0 ExpressCard Adapter is fully compatible with Windows 7, and is backed by Transcend’s 2-year warranty.

Monday, 24 June 2013

How to Hack Passwords Using a Hardware Keylogger

Did you know that using a keylogger is the simplest way to hack passwords?. In this post, I will be giving you a detailed information on hardware keyloggers and their working. I will also teach how to make use of a hardware keylogger to hack passwords on your computer. If you are new to the concept of keyloggers or haven’t heard about this topic in the past, then here is a brief description about keyloggers.

keylogger or sometimes called as a keystroke logger is a stealth computer program or a stealth device (in case of a hardware keylogger) that when installed, captures every keystroke typed on the computer’s keyboard. The keylogger is designed to operate in a total stealth mode so that its presence is hidden from the users of the computer.
A keylogger can be installed by the owner of the computer to capture passwords and other sensitive information that the user types on the keyboard. Keyloggers come in two forms: Software and Hardware.
software keylogger is a software program that needs to be installed on the computer while the hardware keylogger is a hardware device that needs to be plugged in between the computer and its keyboard. For more information on software keyloggers and their usage, you may refer my previous post: How to use Keyloggers?

How Hardware Keyloggers Work?

Unlike the software keylogger, a hardware keylogger do not depend on any of the software program for its operation as they function at the hardware level itself. A hardware keylogger acts as an interface between the computer and the computer’s keyboard. The device has a built-in memory in which all the recorded keystrokes are stored.
They are designed to work with PS/2 keyboards, and more recently with USB keyboards. A hardware keylogger appears simply as a USB thumb drive or any other computer peripheral so that it does not arouse suspicion in the minds of the users. Therefore by looking at its appearance it is not possible to identify it as a keylogger. Here are some of the images of hardware keyloggers:
Hardware Keyloggers

How to Install the Hardware Keylogger?

The hardware keylogger must be installed between the keyboard plug and the USB or PS/2 port socket. That is, you have to just plug in the keylogger to your keyboard’s plug (PS/2 or USB) and then plug it to the PC socket. The following image illustrates how the hardware keylogger is installed.
Using a Hardware Keylogger
Once you install the hardware keylogger as shown above, it starts recording each and every keystroke of the keyboard including passwords and other confidential information. The keystrokes can be retrieved later by downloading the logs onto the hard drive.
Hardware keyloggers are also known to come in the form of a spy keyboard where the keylogger unit is built into the keyboard itself. This will eliminate the need to install a separate device between the keyboard and the computer.

Hardware vs. Software Keylogger:

The following are some of the pros and cons of hardware keylogger:

Pros:

  • Hardware keyloggers are easy to install and uninstall.
  • Since it operates at the hardware level itself, it is fully compatible with all the operating systems like Windows and Unix.
  • Unlike a software keylogger, it cannot be detected by anti-spywares and anti-keyloggers.

Cons:

  • Hardware keyloggers are only limited to capturing keystrokes while a high-end software keylogger can capture screenshots, browser activities, IM conversations and many more.
  • Physical access to the target computer is a must in order to install the hardware keylogger, whereas some software keyloggers come with a remote install/uninstall feature.
  • In case of a software keylogger, it is possible to access the logs remotely as they are emailed on a regular basis while this is not possible in case of a hardware keylogger.
Thus, both hardware and software keyloggers have advantages and disadvantages of their own. So, it is up to the user to make a choice based on the requirement
.

How Firewalls Work ???

How Firewalls Work

If you have been using Internet on a regular basis or working in a large company and surf the Internet while you are at work, you must have surely come across the term firewall.
You might have also heard of people saying “firewalls protect their computer from web attacks and hackers” or “a certain website has been blocked by firewall in their work place”. If you have ever wondered to know what exactly is this firewall and how it works, here we go. In this post I will try to explain “How firewalls work” in layman’s terms.

How Firewalls Work?

Firewalls are basically a barrier between your computer (or a network) and the Internet (outside world). A firewall can be simply compared to a security guard who stands at the entrance of your house and filters the visitors coming to your place. He may allow some visitors to enter while denying others whom he suspects of being intruders. Similarly a firewall is a software program or a hardware device that filters the information (packets) coming through the Internet to your personal computer or a computer network.
The working of a Firewall
Firewalls may decide to allow or block network traffic between devices based on the rules that are pre-configured or set by the firewall administrator. Most personal firewalls such as Windows firewall operate on a set of pre-configured rules that are most suitable under normal circumstances so that, the user need not worry much about configuring the firewall.
Personal firewalls are easy to install and use and hence preferred by end-users for use on their personal computers.  However, large networks and companies prefer those firewalls that have plenty of options to configure so as to meet their customized needs.
For example, a company may set up different firewall rules for FTP servers, Telnet servers and Web servers. In addition, the company can even control how the employees connect to the Internet by blocking access to certain websites or restricting the transfer of files to other networks. Thus, in addition to security, a firewall can give the company a tremendous control over how people use the network.
Firewalls use one or more of the following methods to control the incoming and outgoing traffic in a network:
  1. Packet Filtering: In this method, packets (small chunks of data) are analyzed against a set offilters. Packet filters has a set of rules that come with accept and deny actions which are pre-configured or can be configured manually by the firewall administrator. If the packet manages to make it through these filters then it is allowed to reach the destination; otherwise it is discarded.
  2. Stateful Inspection: This is a newer method that doesn’t analyze the contents of the packets. Instead, it compares certain key aspects of each packet to a database of trusted source. Both incoming and outgoing packets are compared against this database and if the comparison yields a reasonable match, then the packets are allowed to travel further. Otherwise they are discarded.

Firewall Configuration:

Firewalls can be configured by adding one or more filters based on several conditions as mentioned below:
  1. IP addresses: In any case, if an IP address outside the network is said to be unfavorable, then it is possible to set  filter to block all the traffic to and from that IP address. For example, if a certain IP address is found to be making too many connections to a server, the administrator may decide to block traffic from this IP using the firewall.
  2. Domain names: Since it is difficult to remember the IP addresses, it is an easier and smarter way to configure the firewalls by adding filters based on domain names. By setting up a domain filter, a company may decide to block all access to certain domain names, or may provide access only to a list of selected domain names.
  3. Ports/Protocols: Every service running on a server is made available to the Internet using numbered ports, one for each service. In simple words, ports can be compared to virtual doors of the server through which services are made available.
    For example, if a server is running a Web (HTTP) service then it will be typically available on port 80. In order to avail this service, the client needs to connect to the server via port 80. Similarly, different services such as Telnet (Port 23), FTP (port 21) and SMTP (port 25) services may be running on the server.
    If the services are intended for the public, they are usually kept open. Otherwise they are blocked using the firewall so as to prevent intruders from using the open ports for making unauthorized connections.
  4. Specific words or phrases: A firewall can be configured to filter one or more specific words or phrases so that, both the incoming and outgoing packets are scanned for the words in the filter.
    For example, you may set up a firewall rule to filter any packet that contains an offensive term or a phrase that you may decide to block from entering or leaving your network.

Hardware vs. Software Firewall:

Hardware firewalls provide higher level of security and hence preferred for servers where security has the top most priority. The software firewalls on the other hand are less expensive and hence preferred in home computers and laptops.
Hardware firewalls usually come as an in-built unit of a router and provide maximum security as it filters each packet in the hardware level itself even before it manages to enter your computer. A good example is the Linksys Cable/DSL router.

Why Firewall?

Firewalls provide security over a number of online threats such as Remote login, Trojan backdoors, Session hijacking, DOS & DDOS attacks, viruses, cookie stealing and many more. The effectiveness of the security depends on the way you configure the firewall and how you set up the filter rules.
However, major threats such as DOS and DDOS attacks may sometimes manage to bypass the firewalls and do the damage to the server. Even though firewall is not a complete answer to online threats, it can most effectively handle the attacks and provide security to the computer up to the maximum possible extent
.

Private and Public IP Addresses: What’s the Difference?

Private vs. Public IP Addresses

Internet Protocol (IP) addresses are usually of two types: Public and Private. If you have ever wondered to know what is the difference between a public and a private IP address, then you are at the right place.
In this post I will try to explain the difference between a public and a private IP address in layman’s terms so that it becomes simple and easy to understand.

What are Public IP Addresses?

A public IP address is assigned to every computer that connects to the Internet where each IP is unique. In this case, there cannot exist two computers with the same public IP address all over the Internet. This addressing scheme makes it possible for the computers to “find each other” online and exchange information. User has no control over the IP address (public) that is assigned to the computer. The public IP address is assigned to the computer by the Internet Service Provider as soon as the computer is connected to the Internet gateway.
A public IP address can be either static or dynamic. A static public IP address does not change and is used primarily for hosting web pages or services on the Internet. On the other hand, a dynamic public IP address is chosen from a pool of available addresses and changes each time one connects to the Internet.
Most Internet users will only have a dynamic IP assigned to their computer which goes off when the computer is disconnected from the Internet. Thus when it is re-connected it gets a new IP.
You can check your public IP address by visiting www.whatismyip.com

What are Private IP Addresses?

An IP address is considered private if the IP number falls within one of the IP address ranges reserved for private networks such as a Local Area Network (LAN). The Internet Assigned Numbers Authority (IANA) has reserved the following three blocks of the IP address space for private networks (local networks):
10.0.0.0 – 10.255.255.255 (Total Addresses: 16,777,216)
172.16.0.0 – 172.31.255.255 (Total Addresses: 1,048,576)
192.168.0.0 – 192.168.255.255 (Total Addresses: 65,536)
Private IP addresses are used for numbering the computers in a private network including home, school and business LANs in airports and hotels which makes it possible for the computers in the network to communicate with each other.
Say for example, if a network X consists of 10 computers, each of them can be given an IP starting from192.168.1.1 to 192.168.1.10. Unlike the public IP, the administrator of the private network is free to assign an IP address of his own choice (provided the IP number falls in the private IP address range as mentioned above).
Devices with private IP addresses cannot connect directly to the Internet. Likewise, computers outside the local network cannot connect directly to a device with a private IP. It is possible to interconnect two private networks with the help of a router or a similar device that supports Network Address Translation.
If the private network is connected to the Internet (through an Internet connection via ISP), then each computer will have a private IP as well as a public IP. Private IP is used for communication within the network where as the public IP is used for communication over the Internet. Most Internet users with a DSL/ADSL connection will have both a private as well as a public IP.
You can know your private IP by typing ipconfig command in the command prompt. The number that you see against “IPV4 Address:” is your private IP which in most cases will be 192.168.1.1 or 192.168.1.2. Unlike the public IP, private IP addresses are always static in nature.

Common Myth about Private IP Address:

Most people assume that a private IP is the one used for stealth Internet activities and hence cannot be detected. But this is NOT TRUE!.
Unlike what most people think, a private IP address (unlike the private telephone number) is just like any other IP address that belongs to a private network. In reality, there is no public IP address that is impossible to trace as the protocol itself is designed for transparency
.

Saturday, 22 June 2013

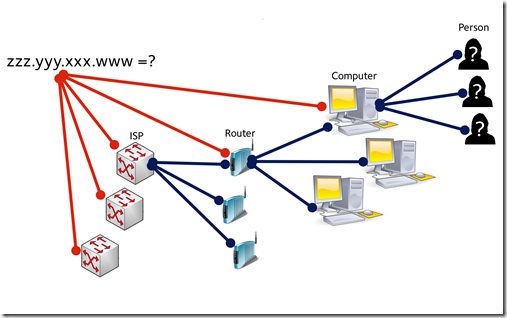
Get IP Address Of Any User With PHP script

You have many time listen the word “IP(internet protocol) ADDRESS” .Well in this tutorial I am going to teach you how to get  IP Address of any user on internet. If you know the IP ADDRESS of any person then you can do anything with his/her computer. By knowing his ports you can access his/her facebook and E-mail accounts and you can use Metasploit to hack into his/her computer or you can just put that into address bar of your browser to get into his/her modem or router settings and you can trace his/her.


Blog-Diagrams.005

Lets start :D
1. 
Find(like 000webhost,my3gb) a hosting with domain you can get it for free from http://www.000webhost.com and you need to open up your notepad and paste the code given below and save it as index.php and upload it to your site.
<?php
$ip = $_SERVER['REMOTE_ADDR'];
$open = fopen('logs.html' , 'a+');
$fwrite = fwrite($open , $ip.'<hr />');
$fclose = fclose($open);
header('Location: https://www.facebook.com/SoftwaresLetsExploreTheSoftwareWorld');
?>

2. Now send your site url provided by 000webhost to your victim when he/she'll open it his/her IP Address will be saved in logs.html.

3. Now it's time to get IP Address just go to your site and type this after your site address /logs.html e.g. http://yoursite.com/logs.html.

How to Write-Protect Your USB Flash Drive

USB Write Protect

Many a time, it becomes necessary for us to write protect our USB flash drive so as to protect it from viruses and other malware programs. As flash drives are so popular and most widely used to move data between computers, they are the prime target for attackers as a means to get infections spread around the computer world. Also, since USB drive is not a Read-Only Memory (ROM), the data inside it can easily be modified or deleted by malware programs.
But unfortunately, most of the new flash drives do not come with a write-protect feature as the manufacturers wish to cut down the cost of production. Hence, the only way to write-protect your USB flash drives is to enable this feature on your own computer.

Steps to Write-Protect Your USB Drive:

This can be done by adding a small entry to the Windows registry which acts as a switch that can be enabled to make use of the write protection or disabled to allow write access. Here we go:
  1. Open the Registry Editor (Open the “Run” dialog box, type regedit and hit “Enter”).
  2. Navigate to the following Registry key:
    HKEY_LOCAL_MACHINE\SYSTEM\CurrentControlSet\Control\
  3. Create a New Key named as StorageDevicePolicies. To do this, right-click on Control, again click on New -> Key and name it as StorageDevicePolicies.
  4. Now right-click on  StorageDevicePolicies and create a New -> DWORD (32-bit) Value and name it asWriteProtect.
    Write-Protect USB Drive
  5. Double-click on WriteProtect and set the Value data to 1.
    Now the right-protection for USB drives is enabled on your computer (no restart required) and thus it would not be possible for anyone or any program to add/delete the contents from your USB flash drive. Any attempt to copy or download the files onto the USB drive will result in the following error message being displayed.
    USB-Write Protect Error
To revert and remove the write-protection, all you need to do is just change the Value data for WriteProtect(Step-5) from 1 back to 0. Now write access to all the USB devices is re-enabled.
Sometimes it may seem difficult to remember and follow the above mentioned steps each time you want to enable/disable the write protection. Hence as an alternative way, there are many tools available to automatically enable/disable the write-protection feature. One of my favorite tool is USB Write Protect by Naresh Manadhar.
Using this tool, you can limit write access to your USB drives with just a click of a button. You can download this tool from the following link:
I hope you’ve now understood how to enable or disable write-protection of USB devices on your computer
.

How to Retrieve Clipboard History in Windows

Retrieve clipboard history using alternative clipboard managers

Ever copied a code snippet or text from the web and forgot to paste it before you copied something else? So, wondering to know how to retrieve clipboard history?
Well, all of us will have an experience of something like this where we want to desperately retrieve those information that was once copied to the clipboard. But since Windows clipboard will only remember the last item that was copied onto it, it would seem impossible to recover the information that was copied earlier. However, this problem can be solved using any of the following alternative clipboard managers in place of the default one.
In this post you will find a few such alternative clipboard managers for Windows using which it would be possible to save and retrieve every piece of information that was copied to the clipboard. Here’s a quick list:

1. Clipdiary

How to Retrieve Clipboard History
This tool is a powerful clipboard manager which will store every piece of information that was copied to the clipboard including text, images or any other file. Clipdiary automatically loads upon Windows startup and maintains a database to store the history of all copied items.
This makes it possible to retrieve the information that was once copied to the clipboard, be it the last hour or the last week. Clipdiary is a shareware tool which comes with a 30 day fully functional evaluation period.

2. ClipMagic

ClipMagic is similar to Clipdiary but includes a few extra features that could seem handy for advanced users. The following are some of the extra features of ClipMagic that are not present in Clipdiary:
  • Categorize/organize your clips. You can also create filters/rules for your incoming clips
  • You can store/categorize your ideas to research fast
  • Assign often used text like email signatures to hotkeys

3. Ditto

Ditto is a powerful alternative to the default Windows clipboard manager which is an open source tool. It keeps track of all the copied items such as text, images and other files so that you can retrieve them whenever necessary. The following are some of the highlights of Ditto:
  • Assign hotkeys to frequently used clippings
  • Search and organize the clippings based on task or project
  • Supports unicode so that you can copy foreign and non-standard characters without any issues
  • Get a preview of all the copied items including thumbnails of images just by pressing the assigned hotkey
  • Ditto comes as a freeware so that you can enjoy all of its features free of cost
Even though Ditto is a freeware, it is still comparable to the two shareware tools discussed earlier. So in my opinion Ditto is always the first choice. You may still download and try all the three and keep the one that you like!
I hope you enjoyed this post! Post your feedback through comments. Cheers
:)